Thursday, May 22, 2014

how to use list in java ?


A JList presents the user with a group of items, displayed in one or more columns, to choose from. Lists can have many items, so they are often put in scroll panes.

In addition to lists, the following Swing components present multiple selectable items to the user: combo boxes, menus, tables, and groups of check boxes or radio buttons. To display hierarchical data, use a tree.


ListTest.java

import java.awt.BorderLayout;
import java.awt.event.ActionEvent;
import javax.swing.ButtonGroup;
import javax.swing.JList;
import javax.swing.JRadioButton;
import javax.swing.JPanel;
import javax.swing.JLabel;
import javax.swing.JFrame;
import javax.swing.JScrollPane;
import javax.swing.event.ListSelectionListener;
import javax.swing.event.ListSelectionEvent;
/*
 This program demonstrates a simple fixed list of strings.
*/

public class ListTest
{
 public static void main(String[] args)
  {
   JFrame frame = new ListFrame();
   frame.setDefaultCloseOperation(JFrame.EXIT_ON_CLOSE);
   frame.setVisible(true);
  }
}

  /**
     This frame contains a word list and a label that shows a
     sentence made up from the chosen words. Note that you can
     select multiple words with Ctrl+click and Shift+click.
  */

class ListFrame extends JFrame
{
 public ListFrame()
  {
   setTitle("ListTest");
   setSize(DEFAULT_WIDTH, DEFAULT_HEIGHT);
   String[] words =
   {
    "quick","brown","hungry","wild","silent",
    "huge","private","abstract","static","final"
   };
   wordList = new JList(words);     // To create List box.
   /* Alternatively, you can use an anonymous array:
    JList wordList = new JList(new String[] {"quick", "brown", "hungry", "wild","silent","huge","private","abstract","static","final" });
   */
/*
By default, the list component displays eight items; use the setVisibleRowCount method to change that value:
wordList.setVisibleRowCount(4); // display 4 items
You can also restrict the user to a more limited selection mode with the setSelectionMode method:
wordList.setSelectionMode(ListSelectionModel.SINGLE_SELECTION);
// select one item at a time
wordList.setSelectionMode(ListSelectionModel.SINGLE_INTERVAL_SELECTION);
// select one item or one range of items
*/
   wordList.setVisibleRowCount(4);
 //List boxes do not scroll automatically. To make a list box scroll, you must insert it into a scroll pane:
   JScrollPane scrollPane = new JScrollPane(wordList);
   listPanel = new JPanel();
   listPanel.add(scrollPane);
   wordList.addListSelectionListener(new ListSelectionListener()
   {
   public void valueChanged(ListSelectionEvent event)
    {
/*
The getSelectedValues method returns an array of objects containing all selected items. Cast each array element to a string.
Object[] values = list.getSelectedValues(); //returns the selected values or an empty array if the selection is empty.
for (Object value : values)
do something with (String) value;
.......................................................
If your list does not allow multiple selections, you can call the convenience method getSelectedValue. It returns the first selected value (which you know to be the only value if multiple selections are disallowed).
String value = (String) list.getSelectedValue();
*/
   Object[] values = wordList.getSelectedValues();
   StringBuilder text = new StringBuilder(prefix);
   // for (int i = 0; i < values.length; i++)
   for (Object value : values)
   {
    //String word = values[i];
    String word = (String) value;
    text.append(word);
    text.append(" ");
  }
 text.append(suffix);
 label.setText(text.toString());
}
});
 buttonPanel = new JPanel();
 group = new ButtonGroup();
/*
You can set the layout orientation to one of three values:
JList.VERTICAL (the default): arrange all items vertically
JList.VERTICAL_WRAP: start new columns if there are more items than the visible row count
JList.HORIZONTAL_WRAP: start new columns if there are more items than the visible row count, but fill them horizontally.
*/
   makeButton("Vertical", JList.VERTICAL);
   makeButton("Vertical Wrap", JList.VERTICAL_WRAP);
   makeButton("Horizontal Wrap", JList.HORIZONTAL_WRAP);
   add(listPanel, BorderLayout.NORTH);
   label = new JLabel(prefix + suffix);
   add(label, BorderLayout.CENTER);
   add(buttonPanel, BorderLayout.SOUTH);
 }
/**
 Makes a radio button to set the layout orientation.
 @param label the button label
 @param orientation the orientation for the list
*/
 private void makeButton(String label, final int orientation)
 {
  JRadioButton button = new JRadioButton(label);
  buttonPanel.add(button);
  if (group.getButtonCount() == 0) button.setSelected(true);
   group.add(button);
   button.addActionListener(new java.awt.event.ActionListener()
   {
   public void actionPerformed(ActionEvent event)
    {
    wordList.setLayoutOrientation(orientation);
    listPanel.revalidate();
    }
 });
 }
  private static final int DEFAULT_WIDTH = 400;
  private static final int DEFAULT_HEIGHT = 300;
  private JPanel listPanel;
  private JList wordList;
  private JLabel label;
  private JPanel buttonPanel;
  private ButtonGroup group;
  private String prefix = "The ";
  private String suffix = "fox jumps over the lazy dog.";
}

/*
List components do not react to double clicks from a mouse. As envisioned by the designers of Swing, you use a list to select an item, and then you click a button to make something happen. However, some user interfaces allow a user to double-click on a list item as a shortcut for item selection and acceptance of a default action. If you want to implement this behavior, you have to add a mouse listener to the list box, then trap the mouse event as follows:
public void mouseClicked(MouseEvent evt)
{
if (evt.getClickCount() == 2)
 {
  JList source = (JList) evt.getSource();
  Object[] selection = source.getSelectedValues();
  doAction(selection);
 }
}
*/
 OUTPUT:-

how to edit and display combobox item in java?


A component that combines a button or editable field and a drop-down list. The user can select a value from the drop-down list, which appears at the user's request. If you make the combo box editable, then the combo box includes an editable field into which the user can type a value.


comboboxd.java

package packge;
import java.awt.*;
import javax.swing.*;
import java.awt.event.*;
public class comboboxd extends JFrame implements ItemListener,ActionListener
{
JComboBox box,box1;
JLabel lbl;
JButton b1,b2,b3;
public comboboxd()
{
Container c=getContentPane();
c.setLayout(new FlowLayout());
c.setBackground(Color.cyan);
box=new JComboBox();
box1=new JComboBox();
lbl=new JLabel();
lbl.setFont(new Font("Arial black",Font.BOLD,12));
b1=new JButton("Set");
b2=new JButton("Show Index");
b3=new JButton("Item at Index");
box.addItem("India");
box.addItem("America");
box.addItem("Germany");
box.addItem("Japan");
box.addItem("France");
box.setEditable(true);      // To edit in ComboBox
box1.addItem("Africa");
box1.addItem("America");
box.addItemListener(this);
box1.addItemListener(this);
b1.addActionListener(this);
b2.addActionListener(this);
b3.addActionListener(this);
c.add(box);
c.add(box1);
c.add(b1);
c.add(b2);
c.add(b3);
c.add(lbl);
}

public void itemStateChanged(ItemEvent ie)
{
/*
itemStateChanged method called twice because it runs when item is selected or deselected.
above problem is resolved using getStateChange() method.
getStateChange() method returns 1 for selected item and 2 for
*/
//deselected item.
int select=ie.getStateChange();
if(select==1)
{
//if box1 item is clicked then perform the logic
if(ie.getSource()==box)
{
String str=String.valueOf(box.getSelectedItem());
lbl.setText("You selected:" +str+" of ComboBox1");
}
//if box2 item is clicked then perform the logic
if(ie.getSource()==box1)
{
/*hello will print twice because itemStateChanged() method
called twice. one for item selected and second for item
deselected.
*/
System.out.println("hello");
String str=String.valueOf(box.getSelectedItem());
lbl.setText("You selected:" +str+" of ComboBox2");
}
}//close of if(select==1)
}//close of itemStateChanged(ItemEvent ie)

public void actionPerformed(ActionEvent ae)
{ 
if(ae.getSource()==b1)
 box.addItem(box.getSelectedItem());
if(ae.getSource()==b2)
 lbl.setText("Your selected Item  index: " +String.valueOf(box.getSelectedIndex()));
if(ae.getSource()==b3)
 lbl.setText("Item at Index: " +String.valueOf(box.getSelectedIndex()) +" is "+String.valueOf(box.getItemAt(box.getSelectedIndex())));
}

public static void main(String args[])
{
comboboxd demo=new comboboxd();
demo.setTitle("combo Box");
demo.setSize(850,300);
demo.setVisible(true);
demo.setDefaultCloseOperation(JFrame.EXIT_ON_CLOSE);
}
}

OUTPUT:-

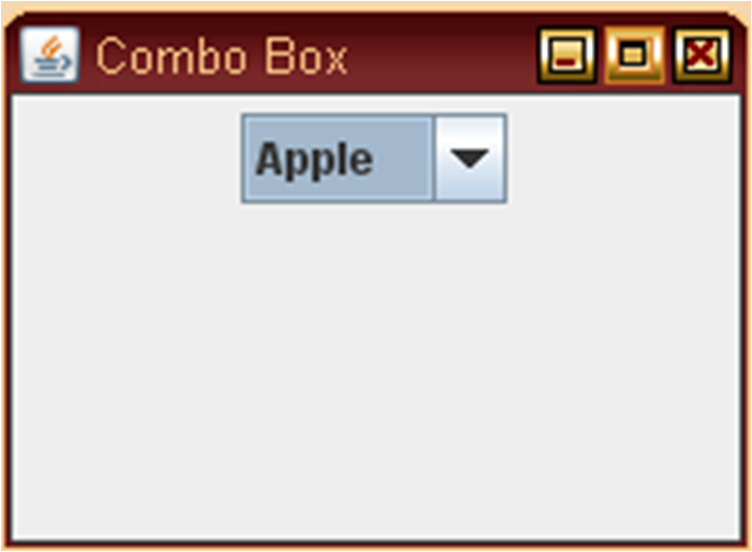
how to use combobox in java?


A component that combines a button or editable field and a drop-down list. The user can select a value from the drop-down list, which appears at the user's request. If you make the combo box editable, then the combo box includes an editable field into which the user can type a value.

combotest1.java

import java.awt.*;

import java.awt.event.*;

import javax.swing.*;

class combotest1 extends JFrame implements ComponentListener

{

JComboBox box;

combotest1()

{

Container c=this.getContentPane();

c.setLayout(new FlowLayout());

box=new JComboBox();

box.setToolTipText("Combo Box");

box.addItem("Apple");

box.addItem("Mango");

box.addItem("Orange");

box.addItem("Banana");

box.addItem("Guava");

box.setBounds(60,20,80,20);

this.addComponentListener(this);

c.add(box);

setResizable(false); //not resizable

setLocation(400,250);

} //close of default constructor

public void componentResized(ComponentEvent e) { }

public void componentMoved(ComponentEvent e)

            {

                        this.setLocation(400,250);

            }

public void componentShown(ComponentEvent e)   { }

public void componentHidden(ComponentEvent e)              { }

public static void main(String args[]){

combotest1 obj=new combotest1();

obj.setVisible(true);

obj.setSize(200,150);

obj.setTitle("Combo Box");

obj.setDefaultCloseOperation(JFrame.EXIT_ON_CLOSE);

}

}


OUTPUT:-


how to use checkbox in java?


A check box provides a way to make a single on/off choice. It consists of a tiny box and a label. The box typically holds a little “x” (or some other indication that it is set) or is empty, depending on whether that item was selected.   You’ll normally create a JCheckBox using a constructor that takes the label as an argument. You can get and set the state, and also get and set the label if you want to read or change it after the JCheckBox has been created.  Whenever a JCheckBox is set or cleared, an event occurs, which you can capture the same way you do a button by using an ActionListener.

                      The following example uses a JTextArea to enumerate all the check boxes that have been checked. The trace( ) method sends the name of the selected JCheckBox and its current state to the JTextArea using append( ), so you’ll see a cumulative list of the checkboxes that were selected and what their state is.


CheckBoxes.java
 
import javax.swing.*;

import java.awt.event.*;

import java.awt.*;


public class CheckBoxes extends JFrame {

private JTextArea t = new JTextArea(6, 15);

private JCheckBox

cb1 = new JCheckBox("Check Box 1"),

cb2 = new JCheckBox("Check Box 2"),

cb3 = new JCheckBox("Check Box 3");

CheckBoxes() {

super("CheckBox Demo");

cb1.addActionListener(new ActionListener() {

public void actionPerformed(ActionEvent e) {

trace("1", cb1);

}

});

cb2.addActionListener(new ActionListener() {

public void actionPerformed(ActionEvent e) {

trace("2", cb2);

}

});

cb3.addActionListener(new ActionListener() {

public void actionPerformed(ActionEvent e) {

trace("3", cb3);

}

});

Container cp = getContentPane();

cp.setLayout(new FlowLayout());

cp.add(new JScrollPane(t));

cp.add(cb1);

cp.add(cb2);

cp.add(cb3);

}

private void trace(String b, JCheckBox cb) {

if(cb.isSelected())

t.append("Box " + b + " Set\n");

else

t.append("Box " + b + " Cleared\n");

}

public static void main(String[] args) {

CheckBoxes chkbox= new CheckBoxes();

//chkbox.setSize(300,300);

chkbox.pack();

chkbox.setDefaultCloseOperation(JFrame.EXIT_ON_CLOSE);

chkbox.setVisible(true);


}

}


OUTPUT:-


Wednesday, May 21, 2014

how to change the width of a textfield dynamically in java?


JTextField textField = new JTextField("Default input", 10);
textField.setColumns(20);
panel.validate();

 After changing the size of a text box with the setColumns method, you need to call the validate method of the surrounding container. The validate method recomputes the size and layout of all components in a container. After you use the validate method, the layout manager repaints the container, and the changed size of the text field will be visible.

In general, you want to let the user add text (or edit the existing text) in a text field. Quite often these text fields start out blank. To make a blank text field, just leave out the string as a parameter for the JTextField constructor:

JTextField textField = new JTextField(20);

You can change the contents of the text field at any time by using the setText method from the TextComponent parent class. For example:

textField.setText("Hello!");

You can find out what the user typed by calling the getText method. This method returns the exact text that the user typed. To trim any extraneous leading and trailing spaces from the data in a text field, apply the trim method to the return value of getText:

String text = textField.getText().trim();

To change the font in which the user text appears, use the setFont method.


Jtextfld.java

import java.awt.BorderLayout;

import java.awt.EventQueue;


import javax.swing.JFrame;

import javax.swing.JPanel;

import javax.swing.border.EmptyBorder;

import javax.swing.JLabel;

import javax.swing.JTextField;

import javax.swing.JButton;

import java.awt.event.ActionListener;

import java.awt.event.ActionEvent;


public class Jtextfld extends JFrame {


            private JPanel contentPane;

            private JTextField textField;


            /**

             * Launch the application.

             */

            public static void main(String[] args) {

                        EventQueue.invokeLater(new Runnable() {

                                    public void run() {

                                                try {

                                                            Jtextfld frame = new Jtextfld();

                                                            frame.setVisible(true);

                                                } catch (Exception e) {

                                                            e.printStackTrace();

                                                }

                                    }

                        });

            }


            /**

             * Create the frame.

             */

            public Jtextfld() {

                        setAlwaysOnTop(true);

                        setResizable(false);

                        setTitle("TextFiled ");

                        setDefaultCloseOperation(JFrame.EXIT_ON_CLOSE);

                        setBounds(100, 100, 425, 256);

                        contentPane = new JPanel();

                        contentPane.setBorder(new EmptyBorder(5, 5, 5, 5));

                        setContentPane(contentPane);

                        contentPane.setLayout(null);


                        JLabel lblNewLabel = new JLabel("            Change TextFiled width");

                        lblNewLabel.setBounds(94, 11, 197, 38);

                        contentPane.add(lblNewLabel);


                        textField = new JTextField(); //new JTextField(10); or textField.setColumns(10); or textField.setSize(int width,int height);


                        textField.setBounds(144, 86, 86, 20);

                        contentPane.add(textField);

                        textField.setColumns(10);


                        JButton btnNewButton = new JButton("Original width");

                        btnNewButton.addActionListener(new ActionListener() {

                                    public void actionPerformed(ActionEvent arg0) {

                                                textField.setSize(86, 20);

                                    }

                        });

                        btnNewButton.setBounds(70, 171, 117, 23);

                        contentPane.add(btnNewButton);


                        JButton btnChangeWidth = new JButton("Change width");

                        btnChangeWidth.addActionListener(new ActionListener() {

                                    public void actionPerformed(ActionEvent arg0) {

                                                textField.setSize(140, 20);


                                    }

                        });

                        btnChangeWidth.setBounds(246, 171, 117, 23);

                        contentPane.add(btnChangeWidth);

            }

}


OUTPUT:-


how to use textfield in java?


public class JTextField extends JTextComponent implements SwingConstants

JTextField is a lightweight component that allows the editing of a single line of text. JTextField is intended to be source-compatible with java.awt.TextField where it is reasonable to do so. This component has capabilities not found in the java.awt.TextField class.

JTextField has a method to establish the string used as the command string for the action event that gets fired. The java.awt.TextField used the text of the field as the command string for the ActionEvent. JTextField will use the command string set with the setActionCommand method if not null, otherwise it will use the text of the field as a compatibility with java.awt.TextField.

The method setEchoChar and getEchoChar are not provided directly to avoid a new implementation of a pluggable look-and-feel inadvertently exposing password characters. To provide password-like services a separate class JPasswordField extends JTextField to provide this service with an independently pluggable look-and-feel.

The java.awt.TextField could be monitored for changes by adding a TextListener for TextEvent's. In the JTextComponent based components, changes are broadcasted from the model via a DocumentEvent to DocumentListeners. The DocumentEvent gives the location of the change and the kind of change if desired. The code fragment might look something like:


     DocumentListener myListener = ??;
     JTextField myArea = ??;
     myArea.getDocument().addDocumentListener(myListener);

The horizontal alignment of JTextField can be set to be left justified, leading justified, centered, right justified or trailing justified. Right/trailing justification is useful if the required size of the field text is smaller than the size allocated to it. This is determined by the setHorizontalAlignment and getHorizontalAlignment methods. The default is to be leading justified.

How the text field consumes VK_ENTER events depends on whether the text field has any action listeners. If so, then VK_ENTER results in the listeners getting an ActionEvent, and the VK_ENTER event is consumed. This is compatible with how AWT text fields handle VK_ENTER events. If the text field has no action listeners, then as of v 1.3 the VK_ENTER event is not consumed. Instead, the bindings of ancestor components are processed, which enables the default button feature of JFC/Swing to work.


 JTextField.java


import javax.swing.JFrame;

import javax.swing.JOptionPane;

import javax.swing.JPanel;

import javax.swing.JLabel;

import javax.swing.JButton;

import java.awt.event.ActionListener;

import java.awt.event.ActionEvent;

import java.awt.Color;


public class JTextField extends JFrame {


            private JPanel contentPane;

            private javax.swing.JTextField textField;

            private javax.swing.JTextField textField_1;


            /**

             * Launch the application.

             */

            public static void main(String[] args) {

                        JTextField frame = new JTextField();

                        frame.setVisible(true);


            }


            /**

             * Create the frame.

             */

            public JTextField() {

                        setTitle("JTextField example");

                        setDefaultCloseOperation(JFrame.EXIT_ON_CLOSE);

                        setBounds(100, 100, 450, 300);

                        contentPane = new JPanel();

                        setContentPane(contentPane);

                        contentPane.setLayout(null);

                contentPane.setBackground(Color.BLUE);


                        textField = new javax.swing.JTextField();

                        textField.setBounds(228, 43, 121, 20);

                        contentPane.add(textField);

                        textField.setColumns(10);


                        JLabel lblEnterYourName = new JLabel("Enter your Name");

                        lblEnterYourName.setBounds(40, 40, 102, 27);

                        contentPane.add(lblEnterYourName);


                        JLabel lblEnterAddress = new JLabel("Enter Address");

                        lblEnterAddress.setBounds(40, 102, 86, 27);

                        contentPane.add(lblEnterAddress);


                        textField_1 = new javax.swing.JTextField();

                        textField_1.setBounds(228, 105, 121, 20);

                        contentPane.add(textField_1);

                        textField_1.setColumns(10);


                        final JButton btnSubmit = new JButton("Test");

                        btnSubmit.addActionListener(new ActionListener() {

                                    public void actionPerformed(ActionEvent arg0) {

                                                String txtfld1=textField.getText();

                                                String txtfld2=textField_1.getText();

                                                if(arg0.getSource()==btnSubmit)

                                                JOptionPane.showMessageDialog(JTextField.this,"Your name is "+txtfld1+" and address is "+txtfld2,"MessageBox",1);

                                    }

                        });

                        btnSubmit.setBounds(179, 198, 75, 23);

                        contentPane.add(btnSubmit);

            }

}


OUTPUT:-


how to use buttons in java?


public class JButton extends AbstractButton implements Accessible

The class JButton is an implementation of a push button. This component has a label and generates an event when pressed. It can have Image also.

Buttons can be configured, and to some degree controlled, by Actions. Using an Action with a button has many benefits beyond directly configuring a button.


  DisplyButton.java

import javax.swing.*;

import java.awt.event.*;

import java.awt.*;


public class DisplyButton {

  private JButton b1 = new JButton("Button 1"),b2 = new JButton("Button 2");

  private JTextField txt = new JTextField(10);


  class ButtonListener implements ActionListener {

    public void actionPerformed(ActionEvent e) {

      //String name = ((JButton)e.getSource()).getText();  //Return Button name as type String.

      String arg = e.getActionCommand(); //getActionCommand return Button name as String type.


      //if(e.getSource()==b1 || e.getSource()==b2)    

      // txt.setText(arg);


      //if(arg.equals("Button 1") || arg.equalsIgnoreCase("button 2"))

      // txt.setText(arg);


      txt.setText(arg);

    }

  } //close of class ButtonListener


  private ButtonListener bl = new ButtonListener();

  DisplyButton() {

    JFrame jf=new JFrame("JButton");

    b1.addActionListener(bl);

    b2.addActionListener(bl);

    Container cp = jf.getContentPane();

    cp.setLayout(new BorderLayout());


    JPanel jpForBtn=new JPanel();

    jpForBtn.setLayout(new FlowLayout(FlowLayout.RIGHT)); //FlowLayout.LEFT, FlowLayout.CENTER

    jpForBtn.add(b1);

    jpForBtn.add(b2);


    txt.setBackground(Color.WHITE);


    cp.add(jpForBtn,BorderLayout.SOUTH); //add JPanel on Bottom right corner of frame

    cp.add(txt,BorderLayout.NORTH);      //add JTextField on top of frame


    jf.setSize(600,400);

    jf.setResizable(false);

    jf.setDefaultCloseOperation(jf.EXIT_ON_CLOSE);

    jf.setVisible(true);


  } //close of constructor


  public static void main(String[] args) {

    DisplyButton dispbtn=new DisplyButton();


  }

} //close of class DisplyButton


OUTPUT:-


how to change the border of a button in java?


There is a way to change the default button border of swing's JButton to some others by implementing Border and overriding its method. Below is the code to do so.


ChangeButtonShape.java


import java.awt.*;

import javax.swing.*;

import java.awt.geom.*;

import java.awt.event.*;

import javax.swing.border.*;


public class ChangeButtonShape {

public static void main(String[] args) {


try {

            String laf = UIManager.getSystemLookAndFeelClassName();

            UIManager.setLookAndFeel(laf);        //throws UnsupportedLookAndFeelException


    }


            catch (Exception e) {

             e.printStackTrace();

            }

//if the look and feel code is written below the JFrame object then JFrame will

//not be shown as windows look & feel. Only components will shown as windows look.


JFrame frame = new JFrame();

frame.getContentPane().setLayout(null);

JLabel l=new JLabel("Name");

final JTextField text=new JTextField(20);

JButton button = new JButton("Go");

//button.setBackground(Color.lightGray);

l.setBounds(10,10,100,20);

text.setBounds(100,10,180,20);

button.setBounds(10,40,50,20);

button.setBorder(new RoundedBorder(10));

frame.add(l);

frame.add(text);

frame.add(button);


button.addActionListener(new ActionListener(){

    public void actionPerformed(ActionEvent e){

String st=text.getText();

JOptionPane.showMessageDialog(null,"Hello "+st);


    }

});

frame.setSize(300,150);

frame.setVisible(true);


}

}

class RoundedBorder implements Border {

        int radius;

        RoundedBorder(int radius) {

            this.radius = radius;

        }

        public Insets getBorderInsets(Component c) {

            return new Insets(this.radius+1, this.radius+1, this.radius+2, this.radius);

        }

        public boolean isBorderOpaque() {

            return true;

        }

        public void paintBorder(Component c, Graphics g, int x, int y, int width, int height) {

            g.drawRoundRect(x,y,width-1,height-1,radius,radius);

        }

    }


OUTPUT:-


how to use dialog box in java?


A Dialog window is an independent subwindow meant to carry temporary notice apart from the main Swing Application Window. Most Dialogs present an error message or warning to a user, but Dialogs can present images, directory trees, or just about anything compatible with the main Swing Application that manages them.

For convenience, several Swing component classes can directly instantiate and display dialogs. To create simple, standard dialogs, you use the JOptionPane class. The ProgressMonitor class can put up a dialog that shows the progress of an operation. Two other classes, JColorChooser and JFileChooser, also supply standard dialogs. To bring up a print dialog, you can use the Printing API. To create a custom dialog, use the JDialog class directly.

The code for simple dialogs can be minimal. For example, here is an informational dialog:


Here is the code that creates and shows it:

JOptionPane.showMessageDialog(frame, "Eggs are not supposed to be green.");

Below is the code to show dialog box by clicking on button:
 Jdialog.java         


import java.awt.BorderLayout;

import java.awt.EventQueue;

import javax.swing.JFrame;

import javax.swing.JOptionPane;

import javax.swing.JPanel;

//import javax.swing.border.EmptyBorder;

import javax.swing.JLabel;

import javax.swing.JButton;

import java.awt.event.ActionListener;

import java.awt.event.ActionEvent;


public class Jdialog extends JFrame {

            private JPanel contentPane;

            private javax.swing.JTextField textField;

            private javax.swing.JTextField textField_1;

            /**

             * Launch the application.

             */

            public static void main(String[] args) {

                                                     Jdialog frame = new Jdialog();

                                                            frame.setVisible(true);

                                                                        }


            /**

             * Create the frame.

             */

            public Jdialog() {

                        setTitle("JTextField example");

                        setDefaultCloseOperation(JFrame.EXIT_ON_CLOSE);

                        setBounds(100, 100, 450, 300);

                        contentPane = new JPanel();

                        //contentPane.setBorder(new EmptyBorder(5, 5, 5, 5));

                        setContentPane(contentPane);

                        contentPane.setLayout(null);


                        textField = new javax.swing.JTextField();

                        textField.setBounds(228, 43, 121, 20);

                        contentPane.add(textField);

                        textField.setColumns(10);


                        JLabel lblEnterYourName = new JLabel("Enter your Name");

                        lblEnterYourName.setBounds(40, 40, 102, 27);

                        contentPane.add(lblEnterYourName);


                        JLabel lblEnterAddress = new JLabel("Enter Address");

                        lblEnterAddress.setBounds(40, 102, 86, 27);

                        contentPane.add(lblEnterAddress);


                        textField_1 = new javax.swing.JTextField();

                        textField_1.setBounds(228, 105, 121, 20);

                        contentPane.add(textField_1);

                        textField_1.setColumns(10);


                        final JButton btnSubmit = new JButton("Submit");

                        btnSubmit.addActionListener(new ActionListener() {

                                    public void actionPerformed(ActionEvent arg0) {

                                                String txtfld1=textField.getText();

                                                String txtfld2=textField_1.getText();

                                                if(arg0.getSource()==btnSubmit)

                                                {

                                                //String arg = arg0.getActionCommand(); //Return clicked button name

                                                //if (arg.equals("btnSubmit"))

                                                JOptionPane.showMessageDialog(Jdialog.this,"Your name is "+txtfld1+" and address is "+txtfld2,"MessageBox",1);

                                          }

                                    }

                        });

                        btnSubmit.setBounds(179, 198, 75, 23);

                        contentPane.add(btnSubmit);

            }

}


OUTPUT:-


Tuesday, May 20, 2014

how to change background color of JPanel by clicking buttons?


The JPanel class provides general-purpose containers for lightweight components. By default, panels do not add colors to anything except their own background; however, you can easily add borders to them and otherwise customize their painting. Details can be found in Performing Custom Painting.

In many types of look and feel, panels are opaque by default. Opaque panels work well as content panes and can help with painting efficiently, as described in Using Top-Level Containers. You can change a panel's transparency by invoking the setOpaque method. A transparent panel draws no background, so that any components underneath show through.


JpanelBackground.java


import java.awt.*;

import java.awt.event.*;

import javax.swing.*;


 public class JpanelBackground

 {

 public static void main(String[] args)

 {

 ButtonFrame frame = new ButtonFrame();

 frame.setDefaultCloseOperation(JFrame.EXIT_ON_CLOSE);

 frame.show();

 }

 }


 /**

 A frame with a button panel

 */

 class ButtonFrame extends JFrame

 {

 public ButtonFrame()

 {

 setTitle("ButtonTest");

 setSize(WIDTH, HEIGHT);


 // add panel to frame


 ButtonPanel panel = new ButtonPanel();

 Container contentPane = getContentPane();

 contentPane.add(panel);

 }


 public static final int WIDTH = 300;

 public static final int HEIGHT = 200;

 }  //close of class ButtonFrame


 /**

 A panel with three buttons.

 */

 class ButtonPanel extends JPanel

 {

 public ButtonPanel()

 {

 // create buttons


 JButton yellowButton = new JButton("Yellow");

 JButton blueButton = new JButton("Blue");

 JButton redButton = new JButton("Red");


 // add buttons to panel


 add(yellowButton);

 add(blueButton);

 add(redButton);


 // create button actions


 ColorAction yellowAction = new ColorAction(Color.yellow);

 ColorAction blueAction = new ColorAction(Color.blue);

 ColorAction redAction = new ColorAction(Color.red);


 // associate actions with buttons


 yellowButton.addActionListener(yellowAction);

 blueButton.addActionListener(blueAction);

 redButton.addActionListener(redAction);

 }


 /**

 An action listener that sets the panel's background color.

 */

 private class ColorAction implements ActionListener

 {

 public ColorAction(Color c)

 {

 backgroundColor = c;

 }


 public void actionPerformed(ActionEvent event)

 {

 setBackground(backgroundColor);

 //repaint();

 }


 private Color backgroundColor;

 } //close of class ColorAction


}//close of class ButtonPanel


OUTPUT:-


how to add buttons on JPanel in java?


The JPanel class provides general-purpose containers for lightweight components. By default, panels do not add colors to anything except their own background; however, you can easily add borders to them and otherwise customize their painting. Details can be found in Performing Custom Painting.

In many types of look and feel, panels are opaque by default. Opaque panels work well as content panes and can help with painting efficiently, as described in Using Top-Level Containers. You can change a panel's transparency by invoking the setOpaque method. A transparent panel draws no background, so that any components underneath show through.


AddButton.java

import javax.swing.*;

import java.awt.event.*;

import java.awt.*;


public class AddButton {

  private JButton b1 = new JButton("Button 1"),b2 = new JButton("Button 2");

  private JTextField txt = new JTextField(10);


  class ButtonListener implements ActionListener {

    public void actionPerformed(ActionEvent e) {

      //String name = ((JButton)e.getSource()).getText();  //Return Button name as type String.

      String arg = e.getActionCommand(); //getActionCommand return Button name as String type.


      //if(e.getSource()==b1 || e.getSource()==b2)    

      // txt.setText(arg);


      //if(arg.equals("Button 1") || arg.equalsIgnoreCase("button 2"))

      // txt.setText(arg);


      txt.setText(arg);

    }

  } //close of class ButtonListener


  private ButtonListener bl = new ButtonListener();

  AddButton() {

    JFrame jf=new JFrame("JButton");

    b1.addActionListener(bl);

    b2.addActionListener(bl);

    Container cp = jf.getContentPane();

    cp.setLayout(new BorderLayout());


    JPanel jpForBtn=new JPanel();

    jpForBtn.setLayout(new FlowLayout(FlowLayout.RIGHT)); //FlowLayout.LEFT, FlowLayout.CENTER

    jpForBtn.add(b1);

    jpForBtn.add(b2);


    txt.setBackground(Color.WHITE);


    cp.add(jpForBtn,BorderLayout.SOUTH); //add JPanel on Bottom right corner of frame

    cp.add(txt,BorderLayout.NORTH);      //add JTextField on top of frame


    jf.setSize(600,400);

    jf.setResizable(false);

    jf.setDefaultCloseOperation(jf.EXIT_ON_CLOSE);

    jf.setVisible(true);


  } //close of constructor


  public static void main(String[] args) {

    AddButton dispbtn=new AddButton();


  }

} //close of class DisplyButton


OUTPUT:-


Sunday, May 18, 2014

how to use JPanel in java?


JPanel is a lightweight container which can hold components. The default layout of JPanel is FlowLayout. Using this we can add components like button, textfield etc. If it is requirement of adding components on JPanel, Then at first add components on JPanel and then finally add JPanel on JFrame because JPanel is itself a component.

To use JPanel using program:-


frme.java

import javax.swing.JButton;

import javax.swing.JFrame;

import javax.swing.JPanel;

import javax.swing.JTextField;

import java.awt.FlowLayout;

import java.awt.Container;

class frme extends JFrame

{  private Container c;

 frme()

 {    c=getContentPane();

  c.setLayout(new FlowLayout());

  setTitle("Using JPanel");

 /* create object of class 'panl' */

  panl pn=new panl();

 /* add panl's class object to container   */

  c.add(pn);

  setSize(400,200);

  setVisible(true);

  setDefaultCloseOperation(EXIT_ON_CLOSE);

  } //close of constructor of class frme

public static void main(String args[])

 {    new frme();

 }  } //close of class frme

 panl.java
class panl extends JPanel

{ 

JButton btnLogin,btnCancl;

 panl()

 {

 btnLogin=new JButton("Button1");

 btnCancl=new JButton("Cancle");

add(btnLogin); add(btnCancl); add(new panltxtbox()); 

 } //close of constructor of class panl


class panltxtbox extends JPanel

 {  

JTextField jf;

 panltxtbox()

  {   jf=new JTextField(10);

  add(jf);

  }

  } //close of class panltxtbox


} //close of class panl


Here is the Output:


how to use JInternalFrame in java?


JInternalFrame is a lightweight object that provides many of the features of a native frame, including dragging, closing, becoming an icon, resizing, title display, and support for a menu bar. Generally, JInternalFrames are added to a JDesktopPane.

To use JInternalFrame using program:-


 UseInternalFrm.java

import javax.swing.*;


import java.awt.event.*;

import java.awt.FlowLayout;

class UseInternalFrm extends JFrame

{

JButton btn;

JDesktopPane deskTop;

UseInternalFrm()

{

super("JInternalFrame"); //setTitle("JInternalFrame");

deskTop=new JDesktopPane();

setContentPane(deskTop);

setLayout(null);

btn=new JButton("JInternalFrame");

add(btn);

btn.setBounds(200,70,140,30);

btn.addActionListener(new ActionListener(){  //anonymous inner classes

public void actionPerformed(ActionEvent e)

{

 if(e.getSource()==btn)

 {

 InternalFrm frm=new InternalFrm();

 deskTop.add(frm);

 frm.setLocation(250,140);

      }

}   });   


setBounds(150,200,600,550);

setVisible(true);

setDefaultCloseOperation(EXIT_ON_CLOSE);

}

public static void main(String arg[])

{

new UseInternalFrm();

}


}//close of class UseInternalFrm


 InternalFrm.java

import javax.swing.*;

class InternalFrm extends JInternalFrame

{

InternalFrm()

{

super("JInternalFrame",false,true,false,true);  //super("string title",boolean resizable,boolean frame_close,boolean frame_maximize,boolean frame_minimize)

JLabel jlb=new JLabel("Showing Label");

add(jlb);

setVisible(true);

setBounds(150,200,300,250);

}

}//close of class InternalFrm


Here is the Output:-


how to use JFrame in java?


An extended version of java.awt.Frame that adds support for the JFC/Swing component architecture. The default layout of JFrame is BorderLayout.  Unlike a Frame, a JFrame has some notion of how to respond when the user attempts to close the window. The default behavior is to simply hide the JFrame when the user closes the window. To change the default behavior, you invoke the method setDefaultCloseOperation(int).

To use JFrame in program:-

GuiWindow.java

import javax.swing.*;
class GuiWindow
{
private JButton btnLogin,btnCancl;
void go()
{
JFrame jf=new JFrame();
jf.setTitle("JFrame ex");
jf.getContentPane().setBackground(java.awt.Color.RED);
jf.setLayout(null);
btnCancl=new JButton("Cancel");
btnLogin=new JButton("Login");
btnCancl.setBounds(5,10,80,30);
btnLogin.setBounds(95,10,80,30);
jf.add(btnCancl); jf.add(btnLogin);
jf.setSize(300,200);
jf.setVisible(true);
jf.setResizable(false); 
jf.getRootPane().setWindowDecorationStyle(JRootPane.PLAIN_DIALOG);
//JFrame.EXIT_ON_CLOSE
jf.setDefaultCloseOperation(jf.EXIT_ON_CLOSE); 
}

public static void main(String args[])
{
GuiWindow gw=new GuiWindow();
gw.go(); 
} 
}

Here is the Output:-